PISCO TELESCOPE INTERFACE
The PISCO software allows you to perform a simple control
of a two axis telescopes. The objective is to make available a virtual hand
controller through the PC interface. This virtual hand-controller does not permit
to perform large moves over 30°. However, many things can be done with such
a telescope control function in terms of automatic image acquisition with the
Audine camera. Let five a few examples:
- an automatic move over a small angular distance (a few arc seconds up to
some tens of arc seconds) between CCD exposures in order to implement the
"Shift and Add" technic without being permanently near the telescope.
The "Shift and Add" technic allows to remove the fix defects (dead
pixels, dust) of the CCD matrix at the time images are combined together (after
having recentered the images). This allows to significantly improve the signal/noise
ratio.
- an automatic move over a large angular distance (a few arc minutes up to
some tens of arc minutes) between exposures in order to build a super flat-field.
In this case, images are merged using the median technic. As a result, all
the stars in the field are removed and the resulting image is a reference
map of the CCD pixels sensitivity (flat-field).
- building image mosaics by moving the telescope after each exposure or after
a series of exposures over an angle roughly equal to the CCD field. The PISCO
software offers the possibility to perform many mosaic series, which is very
useful in the scope of survey programs.
- performing auto-guiding functions on two axis with the Audine camera.
- recentering the telescope on an object by automatic recognition of a star
field.
The PISCO telescope interface does not permit to know the absolute position
of the telescope and all the moves are performed relativly to the last telescope
psotition. Furthermore, in order to provide an interface compatible with the
largest number of telescopes, the interface does not control directly the telescope
motors, but simply the hand controller. One way or an other, you will have to
"double" the push buttons of your hand controller with the commands
coming from the PISCO electronic interface.
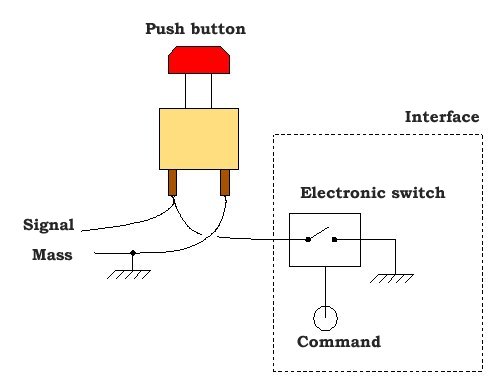
On the figure above, you can notice that the push button, in most of the
hand controllers, simply brings a given signal to the mass. With the PISCO
interface, this function is performed by an electronic switch. The commuting
of the switch is ensured by a signal coming from the PC.
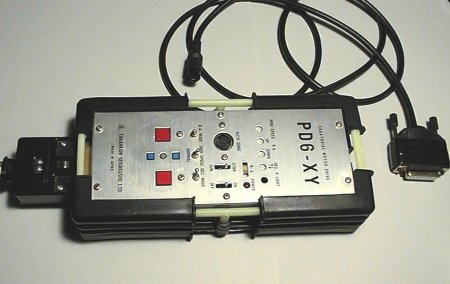
As an example, the figure below displays the cabling of the
Takahashi hand controller (equatorial mount EM200 or NJP160), as seen from
the hand controller wire side (mini DIN plug with 8 male pins).
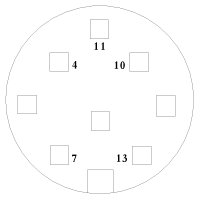
The pin number 11 corresponds to the mass. Pins 4 and 10 correspond
to positive and negative right ascension push buttons. Pins 7and 13 correspond
to positive and negative declination push buttons.
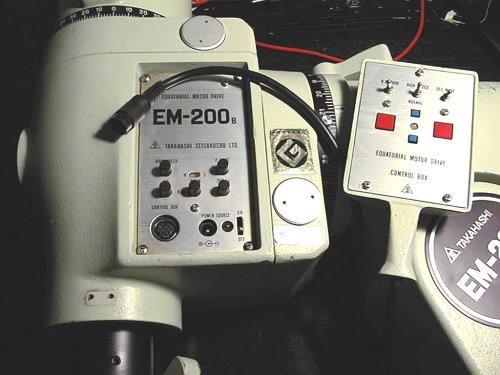
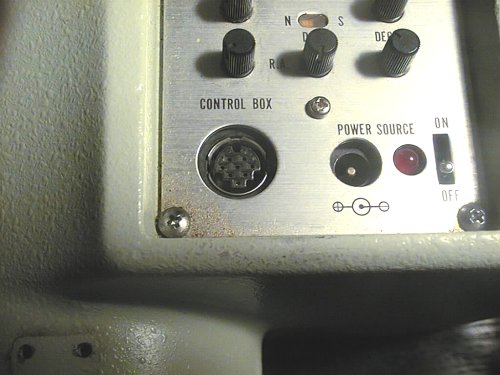
Takahashi mounts are well suited to the PISCO telescope interface since there
is no wire soldering to be performed. In the case of the EM200 mounting, you
must unplug the hand controler and connect the electronic interface (plus CONTROL
BOX).
 In the case of the NJP160 mounting, a special cable will have to be designed,
with on one side the mini DIN plug with 8 pins and on the other side a plug
of your choice. In the example presented here, a DB15 plug has been chosen (refered
as D2 in the following electonic diagrams). The mini DIN plug must be connected
to the AUTO GUIDE plug on the NJP160 hand controller. The advantage of this
configuration compared to the EM200 is that you can control the telescope with
both the manual hand controller and the electonic hand controller.
In the case of the NJP160 mounting, a special cable will have to be designed,
with on one side the mini DIN plug with 8 pins and on the other side a plug
of your choice. In the example presented here, a DB15 plug has been chosen (refered
as D2 in the following electonic diagrams). The mini DIN plug must be connected
to the AUTO GUIDE plug on the NJP160 hand controller. The advantage of this
configuration compared to the EM200 is that you can control the telescope with
both the manual hand controller and the electonic hand controller.
 For the electronic diagram and the PISCO telescope interface
programming, click here
For the electronic diagram and the PISCO telescope interface
programming, click here
Back