
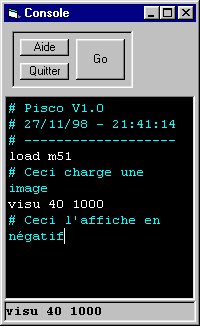
The command Console from the contextual menu (mouse right click in the dark blue image zone) triggers the display of a small text editor. From the Console, you can execute commands in line mode.
A command is made of a keyword, possibly followed by one or several parameters. The parameters must be separated by blank spaces. Note that PISCO is not case sensitive.
You can get the list of available command by clicking the Help button.
A command is launched when you type the <Enter> key. It is possible to go back to a previous command by using the direction key (the cursor position within the line does not matter) and to run it again simply by pressing the <Enter> key. You can take the opportunity to modify the command parameters. This is very convenient for operations you want to repeat many times. All the usual edition modes are available (insert, suppress, copy and paste, ...). You can also select a group of command and execute them by clicking the Go buttton.
By clicking the key combination <Ctrl>+<Enter>, you go to the next line without executing the command on the current line. This is useful to enter command lines not to be executed immediately. This is also useful to insert comment lines within existing command lines. A comment line must start with the # character. For instance:
AMPLI_ON
Turn on the output CCD amplifier.
AMPLI_OFF
Turn off the output CCD amplifier.
BG
Return the background level of the image in memory.
BGNOISE
Return the background noise level.
COMPUTESCAN [FOCUS]
[DECLINATION]
Return the drift-scan parameters. FOCUS is the focal distance expressed in mm.
DECLINATION is the field center declination expressed in pixels.
DECONVFLAT [COEFFICIENT]
Counter the smearing effect in an image exposed without obturator. COEFFICIENT
is the ratio between the reading time of a CCD line and the exposure time.
DIV [NAME] [COEFFICIENT]
Divide the image in memory by the image on disk designated by NAME. The resulting
image is multiplied by the value COEFFICIENT.
EQUAL [DYNAMIC_RANGE]
Perform an histogram equalization of the image currently in memory. The parameter
DYNAMIC_RANGE defines the dynamic range of the final image.
EQUAL2 [DYNAMIC_RANGE]
Perform an histogram equalization of the image currently in memory. This equalization
is optimized for for deep sky images. The parameter DYNAMIC_RANGE defines the
dynamic range of the final image.
EXIT
Exit the PISCO program.
GAUSS2 [SIGMA]
Convolution of the current image by a Gaussian curve with a SIGMA value (SIGMA
values are typically comprised between 1.5 and 3).
GLP [DURATION]
Run an exposure in binning 1x1. The parameter DURATION represents the exposure
time expressed in seconds.
INFO
Return information about the image currently in memory (size and exposure date).
KING [EXPOSURE] [DELAY]
Perform 2 exposures in binning 1x1 wit DELAY seconds between the 2 exposures.
The exposure time is specified with the EXPOSURE parameter. After the exposures,
PISCO performs the images subtraction and displays the result on the screen.
This command can be used to facilitate the telescope setup using the King method.
LOAD [NAME]
Load an image in memory from the current directory
(defined in the item Current Directory from the Setup tab). You
can also indicate in which directory to load a particular image by specifying
the full path of the image. For instance:
load c:/nuit7/m51
LP [DURATION]
Run an exposure in binning 2x2. The parameter DURATION is the exposure time
expressed in seconds.
MIRRORX
Rotate the image around a vertical axis.
MIRRORY
Rotates the image around an horizontal axis.
MIRRORXY
Invert the X and Y axis.
MULT [VALUE]
Multiply all the current image pixels by the constant VALUE.
OBTU_OFF
Close the obturator.
OFFSET [VALUE]
Add the constant VALUE to all the pixels of the current image.
OVERSCAN [DURATION]
Perform an exposure in binning 1x1 with an exposure time of DURATION seconds.
The transferred lines are longer than necessary by 30 pixels in order to measure
the transfer efficiency or the electrical offset. This function is used for
the camera tests.
PAL [NUMBER]
Change the image display palette:
- NUMBER = 1 -> gray palette
- NUMBER = 2 ->negative palette
- NUMBER = 3 -> amber palette
- NUMBER = 4 -> rainbow palette
SAVE [NAME]
Save the image in memory in the current directory
(defined in the item Current Directory from the Setup tab). You
can also indicate in which directory to save a particular image by specifying
the full path of the image. For instance:
save c:/nuit7/m51
SAVEBMP [NAME]
Save the image in memory in the current directory
under the form of a bitmap file. The color palette used to create the file is
the active palette.
SCAN [X1] [Y1] [TI] [NB_LINES]
Acquisition in drift-scan mode. X1 and X2 are the width limits of the drift-scan
band. In order to work with the full width of the CCD matrix, the values X1=1
and X2=768 must be used (in the case the Audine camera has a KAF-0400/1E chip).
TI is the exposure time per pixel expressed in milliseconds (refer to command
COMPUTESCAN). NB_LINES is the number of lines to be used for the scan. The total
acquisition time is therefore TI x NB_LINES. Example: SCAN 100 400 86.5 2000
SET0
This command is used to test the Audine camera. It forces all the parallel port
bits to 0.
SET255
This command is used to test the Audine camera. It forces all the parallel port
bits to 1.
SETC0
Set to 0 the 4 bits of the camera extension port.
SETC255
Set to 1 the 4 bits of the camera extension port.
SUB [NAME] [CONSTANT]
Subtract to the image in memory the image on disk designated by NAME. The constant
value CONSTANT is added to the result.
TEST1 [NUMBER]
Perform NUMBER cycles of transfer between the image zone and the horizontal
register. This function is used for the purpose of testing the camera.
TEST2 [NUMBER]
Perform NUMBER cycles of fast reading of the camera (no digitization).This function
is used for the purpose of testing the camera.
VIDEO [TI] [POSX] [WIDTH] [NB_LINES]
Acquisition in video mode. The band width is WIDTH centered on pixel POSX. The
band height is NB_LINES and the exposure time is proportional to TI. Example
: VIDEO 600 300 120 2400 (the exposure time of 600 is relative and must be adjusted
according to the result). In this example, the small images have a format of
120x120 pixels. They are centered on column 300 of the CCD. Since the image
is 2400 pixel high, we get 2400/120=20 small images in the final image.
VISU [HIGH] [LOW]
Display an image with HIGH as the high threshold and LOW as the low threshold.